
Installation and details
How chimney flashing meets a metal roof
In brief
Flashing around a chimney on a metal roof must take over the water flowing down the slope and direct it safely onto the covering, while allowing for roof movement and the chimney construction. Simply applying tape or sealant is not enough. Check the geometry of the detail, the order of laps, the fit to the sheet profile and the connection to the chimney. Pay attention to drainage behind the chimney, fixings in the water-flow zone and the termination of the flashing at the vertical part of the chimney.
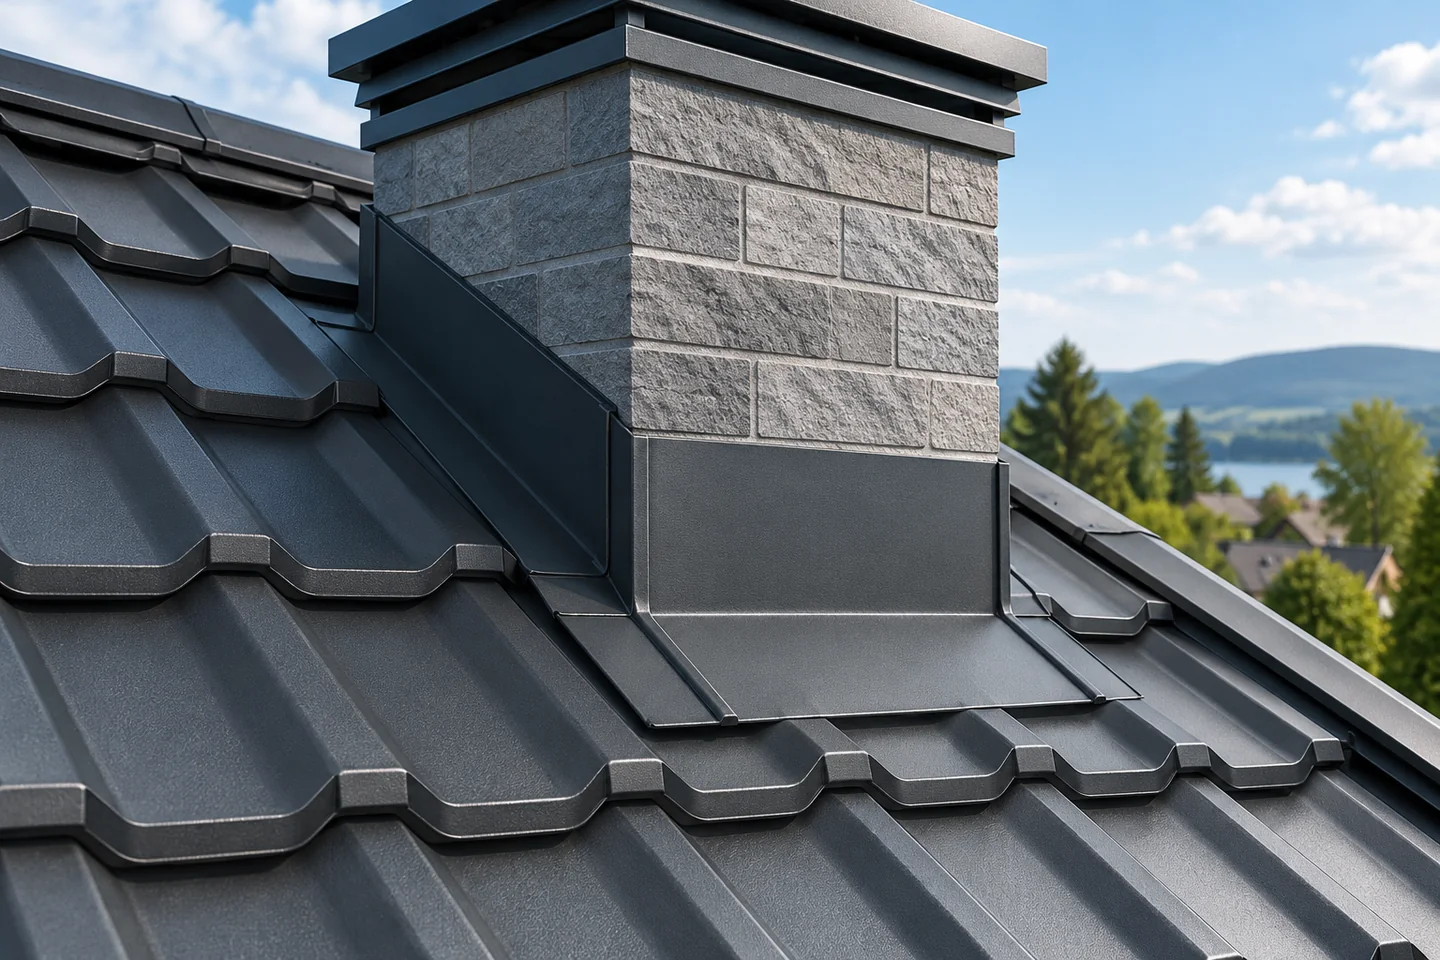
Why is a chimney a difficult point on a roof?
The chimney interrupts the continuity of the roofing and the layers beneath it. Water flows in from the higher part of the roof slope and changes direction at the obstruction. The junction is exposed to snow, wind and movement of materials. Even carefully laid steel sheet will not provide a seal if the flashing does not have the correct geometry or connects poorly to the chimney.
The details depend on the roofing profile, the roof pitch and the position and width of the chimney. The detail is formed differently for trapezoidal steel sheet than for modular tile-effect metal roofing. Dimensions should not be copied from a random photograph. Before work begins, the roofing manufacturer’s instructions and the requirements of the chimney system must be checked, including the permitted methods of fixing flashings.
What role do the lower and side sections of the flashing play?
The lower part takes water from the surface of the chimney and directs it onto the roof slope below. It must work together with the shape of the roofing. The side sections lead water along the chimney to the drainage zone. The order in which the elements are overlapped should correspond to the direction of flow. A reversed lap can let water under the steel sheet even with apparently careful sealing.
The pressings of trapezoidal steel sheet and tile-effect metal roofing require matched solutions. Not all gaps should be filled with any random foam. The necessary sealing elements are selected according to the profile and the instructions. Water must have an unobstructed path to the outside. Sealing the wrong place too tightly can create a reservoir instead of protecting against leakage.
What happens to the water behind the chimney?
The upper section receives water from the roof slope above the chimney. It is particularly important with a greater width of the obstruction and a long roof slope. The detail should be shaped so as to limit the accumulation of water and contaminants. In certain arrangements an additional solution dividing the flow to the sides may be required. It is selected according to the geometry of the specific roof.
Do not leave a random flat pocket behind the chimney. Leaves, snow and ice can obstruct drainage and increase the risk of leakage. Also check the position of sheet joints and fixings in this zone. They should result from the planned detail. A screw passing through an area of intensive water flow does not become problem-free simply because it has a seal.

How should the flashing be connected to the chimney?
The junction must restrict water access behind the vertical part of the flashing. Depending on the solution, a suitable cover flashing, strip or other intended termination is used. The method of fixing should suit the construction of the chimney. The elements of the system must not be cut or drilled arbitrarily if its documentation does not permit such work.
It is worth allowing for independent movement of the chimney and the roof slope. A rigid connection may deform or crack during temperature changes and structural movement. The sealant performs a specific function within the detail, but does not replace correctly laid flashings. Its type should be compatible with the substrate and the conditions in which it will work.
What about the membrane and fire safety?
The layer beneath the covering also requires detailing at the chimney. Water that reaches it should be directed in accordance with the roof layout. The membrane must not be terminated arbitrarily at the opening in the hope that the external flashing alone will suffice. The exact method of connection depends on the materials used, the geometry and the requirements concerning proximity to the chimney.
Distances from combustible components are determined according to the relevant chimney system and the design. There is no single value suitable for every flue. This also applies to timber, insulation and membranes. PIR insulation board is not a non-combustible material. It should not be brought up to the chimney merely because it insulates well thermally and easily fills the available space.
How do you check the finished detail?
After installation, check the drainage, laps, fixings and the termination of the flashing at the chimney. Look out for cracks, leftover swarf and places where leaves may collect. Service access should allow safe inspection. Work on the roof requires proper protection and a contractor who can assess the whole system, not just the visible gap.
In the event of a leak, establish the path of the water before covering the detail with another layer of sealant. The location of the damp patch inside need not be directly beneath the defect. Also check the covering above the chimney and the underlay. A lasting repair removes the cause and restores correct drainage. Merely sealing the visible edge on a temporary basis may only postpone the problem.
7 branches. Materials closer to your project.

- SEROCK — Dzierżenin 34 E
- BŁONIE — ul. Sochaczewska 138A
- RADOM — ul. Grobickiego 8
- ŁÓDŹ — Natolin 8
- OLSZTYN — Barczewo, ul. Prosta 9
- WROCŁAW — ul. Jerzmanowska 10C
- GORZÓW WLKP. — ul. Zielona 33/34